My T500 project
Moderators: oldjapanesebikes, H2RICK, Suzsmokeyallan
-
Jughead
- This IS the real me!!!
- Posts: 540
- Joined: Tue Dec 02, 2008 7:48 pm
Re: My T500 project
Okie Dokie.I was wanting to Keep a set of those on my bike for ease of Disassembly but found out they Disassemble on their Own too easy.lol
Hang me from the Tree of Shame.Damn! I forgot the Rope.
-
Wingspan
- On the main road
- Posts: 136
- Joined: Sun Aug 22, 2010 4:39 pm
Re: My T500 project
They work ok if you toss the cheap hardware and use quality locking nuts. I don't plan on using them, but I haven't decided exactly what to use for the final build. Long way to go before the headlight is a big worry. I just tossed it in for a bit of inspiration. It's been a while since this pile of parts resembled a motorcycle.Jughead wrote:Okie Dokie.I was wanting to Keep a set of those on my bike for ease of Disassembly but found out they Disassemble on their Own too easy.lol
-
Jughead
- This IS the real me!!!
- Posts: 540
- Joined: Tue Dec 02, 2008 7:48 pm
Re: My T500 project
I've been searching for the ones I'm using right now.They are 1 Piece aluminum with rubber Spacers.If i ever find them I'll let you know. 
Hang me from the Tree of Shame.Damn! I forgot the Rope.
-
Wingspan
- On the main road
- Posts: 136
- Joined: Sun Aug 22, 2010 4:39 pm
Re: My T500 project
I also have a pair of these sitting on the shelf:Jughead wrote:I've been searching for the ones I'm using right now.They are 1 Piece aluminum with rubber Spacers.If i ever find them I'll let you know.
http://www.dimecitycycles.com/vintage-c ... 35830.html" onclick="window.open(this.href);return false;
I don't like them though, they're too long for my taste and put the headlight way out there. I want it tucked as tight to the fork as I can. I may end up making my own and the only one's I've seen that I like cost way too much for a simple set of headlight ears.
-
Jughead
- This IS the real me!!!
- Posts: 540
- Joined: Tue Dec 02, 2008 7:48 pm
Re: My T500 project
OK thats the type I have on the Lil Orange Monster.Actually they came in Handy with the headlight bucket i have on it.They spaced it out a little more from the Gauges than the others.Of course the Wiring in the Bucket is a little strained
Hang me from the Tree of Shame.Damn! I forgot the Rope.
-
Wingspan
- On the main road
- Posts: 136
- Joined: Sun Aug 22, 2010 4:39 pm
Re: My T500 project
Long time, no update...
I wasn't happy with the yellowed clearcoat on the engine, so I stripped and repainted it. This time the cylinders went black:

I've polished the hubs, replaced the wheel bearings, and laced them with stainless spokes to 18" shouldered aluminum rims. The Fedex guy dropped off the new tires today and I'll be spooning them on soon:

Last but not least, I finished the frame mods and it's now been powdercoated in satin black. I've officially begun reassembly!

I wasn't happy with the yellowed clearcoat on the engine, so I stripped and repainted it. This time the cylinders went black:
I've polished the hubs, replaced the wheel bearings, and laced them with stainless spokes to 18" shouldered aluminum rims. The Fedex guy dropped off the new tires today and I'll be spooning them on soon:
Last but not least, I finished the frame mods and it's now been powdercoated in satin black. I've officially begun reassembly!
-
alanr
- To the on ramp
- Posts: 260
- Joined: Sat Jan 29, 2011 10:51 pm
- Location: New Zealand
Re: My T500 project
how did you get the hubs that shinny.I spent hours on mine.they look o k but not like yours.  Alan
Alan
CB360T
TT250
TT250
-
Wingspan
- On the main road
- Posts: 136
- Joined: Sun Aug 22, 2010 4:39 pm
Re: My T500 project
I spent the entire weekend sanding and polishing. No secret to it, just a lot of work.alanr wrote:how did you get the hubs that shinny.I spent hours on mine.they look o k but not like yours.
-
Wingspan
- On the main road
- Posts: 136
- Joined: Sun Aug 22, 2010 4:39 pm
Re: My T500 project
Slowly moving forward...
Engine reassembly:


The frame became a roller for the first time in a long time (temporarily at least):


This morning I put the engine back in the frame, hopefully for the last time:


Next on the "to do" list is pull the wheels back off , sort the brakes out (the drums are empty in the above pics), and finish work on the fork.
Engine reassembly:
The frame became a roller for the first time in a long time (temporarily at least):
This morning I put the engine back in the frame, hopefully for the last time:
Next on the "to do" list is pull the wheels back off , sort the brakes out (the drums are empty in the above pics), and finish work on the fork.
-
Wingspan
- On the main road
- Posts: 136
- Joined: Sun Aug 22, 2010 4:39 pm
Re: My T500 project
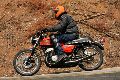
Slowly inching forward...I put the engine back together and in the frame. The rear brakes are functional, front is still just an empty drum. The fork and wheel have to come back off for a bit of work. I've got the carbs apart, cleaned, and waiting on the necessary rebuild parts to arrive. Numerous other parts are on on order. I rolled it out in the drive for a few shots before I pull the front end off to finish up the fork and front brake and move on to wiring (not looking forward to that).

-
Zunspec4
- Expert racer
- Posts: 1087
- Joined: Tue Dec 16, 2008 11:37 am
- Country: UK
- Suzuki 2-Strokes: T500R, SV1000S, TS125, Seeley T500
- Location: Trowbridge UK
Re: My T500 project
Hi Wing,
Just wanted to say that you are producing a gem of a T500 special. I really like the lines of your bike, it's giving me wicked ideas about the GT500 I have stashed in the shed
Cheers Zunspec
Just wanted to say that you are producing a gem of a T500 special. I really like the lines of your bike, it's giving me wicked ideas about the GT500 I have stashed in the shed
Cheers Zunspec
-
titan performance
- Expert racer
- Posts: 1306
- Joined: Wed Oct 13, 2010 2:55 pm
- Country: England
- Suzuki 2-Strokes: TS100, T200, GT250, T500, GT500, GT550, GT750, GS750
- Location: Southeast England
- Contact:
Re: My T500 project
I'm in agreement with Zun......the bike is looking fantastic !
Did you come to a decision on the paintwork yet Wing?
I particularly like the look of the motor....the 3 different finishes really go superbly together.
Did you come to a decision on the paintwork yet Wing?
I particularly like the look of the motor....the 3 different finishes really go superbly together.
Keeping old 2 strokes alive !
-
Wingspan
- On the main road
- Posts: 136
- Joined: Sun Aug 22, 2010 4:39 pm
Re: My T500 project
Thanks guys.
The tail, oil tank, side cover, and front fender are going to be red.
The tail, oil tank, side cover, and front fender are going to be red.
-
Wingspan
- On the main road
- Posts: 136
- Joined: Sun Aug 22, 2010 4:39 pm
Re: My T500 project
Update...
I've rebuilt the carbs:


I spent my Easter sorting out the wiring and am nearly finished. I'm fitting the bike with an aftermarket electronic ignition and charging system from Powerdynamo. No points...YEA! The Powerdynamo kit includes a new stator, rotor, regulator/rectifier, and coil. In theory once the timing is set I shouldn't have to worry about it again.
Stator installed, note the red dot on the backplate, that's a timing mark:

Next find TDC on either cylinder using a dial indicator, then position the piston at 3.4mm BTDC:

Install the rotor with the timing mark on the rotor aligned with the timing mark on the stator backplate:

The timing is set and should never need to be adjusted again (in theory anyway!):

Schematics give me a headache! I can follow them ok, but most of electricity is still just magic to me so this has taken longer to sort out that it should have...but IT ALL WORKS!!!!
Lights...check
Idiot lights...check
Horn...doesn't work but I've got voltage so the horn itself is bad
Spark...CHECK (biggie)
I'm missing a relay I need to make the stock kill switch operate the new ignition properly but the wiring is in place for it and checks out with a meter. It'll be a quick plug in once I find the right relay. The ignition will work without it, but I wouldn't be able to shut it off once it was running.
I started by sorting out the integration of the Powerdynamo system to the stock harness.

Then I moved forward to the controls. Because of the lower bars all the harnesses need to be shortened. The kill switch and ft. brake light switch are just bullet connectors and easy to shorten but the left grip controls all the lighting functions and had a multi-pin connector plus some bullets. I didn't want to mess with that, so I decided to shorten the harness at the opposite end. I disassembled the switch housing un-soldered the wires from the switches, shortened everything 7", and re-soldered and assembled.


At this point I hooked everything up with the stock gauges, took a deep breath and turned the key. No smoke came out and everything worked! I pulled one of the spark plugs and gave her a kick...BLUE SPARK! At that point I switched to the schematic for the Acewell gauge, started marking wires, and twisting them together for a test run. Soon I ran out of wires and it was time to turn the key again...

WHOOOHOOOO!!!
Next up, replacing the wire twists with proper connections, stuffing it all inside the headlight, and making it all look neat.

I've rebuilt the carbs:
I spent my Easter sorting out the wiring and am nearly finished. I'm fitting the bike with an aftermarket electronic ignition and charging system from Powerdynamo. No points...YEA! The Powerdynamo kit includes a new stator, rotor, regulator/rectifier, and coil. In theory once the timing is set I shouldn't have to worry about it again.
Stator installed, note the red dot on the backplate, that's a timing mark:
Next find TDC on either cylinder using a dial indicator, then position the piston at 3.4mm BTDC:
Install the rotor with the timing mark on the rotor aligned with the timing mark on the stator backplate:
The timing is set and should never need to be adjusted again (in theory anyway!):
Schematics give me a headache! I can follow them ok, but most of electricity is still just magic to me so this has taken longer to sort out that it should have...but IT ALL WORKS!!!!
Lights...check
Idiot lights...check
Horn...doesn't work but I've got voltage so the horn itself is bad
Spark...CHECK (biggie)
I'm missing a relay I need to make the stock kill switch operate the new ignition properly but the wiring is in place for it and checks out with a meter. It'll be a quick plug in once I find the right relay. The ignition will work without it, but I wouldn't be able to shut it off once it was running.
I started by sorting out the integration of the Powerdynamo system to the stock harness.
Then I moved forward to the controls. Because of the lower bars all the harnesses need to be shortened. The kill switch and ft. brake light switch are just bullet connectors and easy to shorten but the left grip controls all the lighting functions and had a multi-pin connector plus some bullets. I didn't want to mess with that, so I decided to shorten the harness at the opposite end. I disassembled the switch housing un-soldered the wires from the switches, shortened everything 7", and re-soldered and assembled.
At this point I hooked everything up with the stock gauges, took a deep breath and turned the key. No smoke came out and everything worked! I pulled one of the spark plugs and gave her a kick...BLUE SPARK!
WHOOOHOOOO!!!
Next up, replacing the wire twists with proper connections, stuffing it all inside the headlight, and making it all look neat.
-
CJF
- To the on ramp
- Posts: 306
- Joined: Mon Dec 15, 2008 8:57 pm
Re: My T500 project
Looking great. Looks like we are both spending a lot of time on electrics these days. I put the same acewell unit on my bike. How did you end up mounting it?
Chris
'76 TR500 Style Cafe
'75 T500 - Cafe Build Underway
'78 Honda CB 750 Super Sport
'76 TR500 Style Cafe
'75 T500 - Cafe Build Underway
'78 Honda CB 750 Super Sport
